
Start with the base, then fit the sides
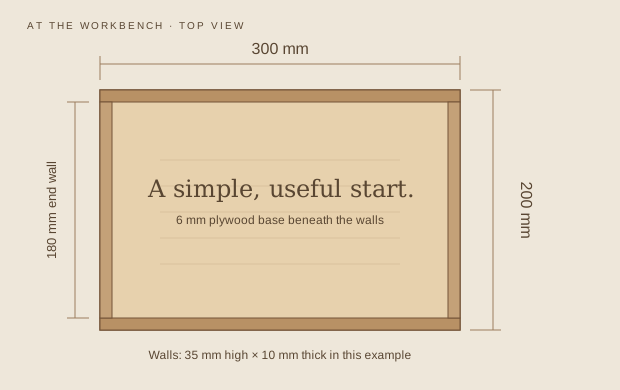
A small tray teaches a useful habit: make the part that controls the dimensions first. This concept uses a plywood base with solid-wood walls standing on top of it. The finished outside footprint is 300 × 200 mm. It is an organizer, not a tested serving tray or a vessel for food or liquids.
Choose flat, clean stock. The example walls are 10 mm thick and 35 mm tall. Measure their actual thickness before cutting the two shorter walls; their length equals 200 mm minus twice that measurement.
- Base: one piece of 6 mm plywood, 300 × 200 mm.
- Long walls: two pieces, 300 × 35 × 10 mm.
- End walls: two pieces, 180 × 35 × 10 mm at exactly 10 mm thickness.
Prepare the contact surfaces
Label the outward faces and arrange the walls on the base. The end walls fit between the long walls, with all four outside faces aligned to the base edges. A square should touch both neighboring walls without a wedge-shaped gap. Correct a crooked end before reaching for glue.
Sand the inside faces while they remain easy to reach. Ease the upper edges lightly, but leave the narrow underside of each wall and the mating corner faces crisp. Rounding a glue surface reduces its contact area and makes the corner look open.
Assemble in a controlled sequence
Dry-fit the complete tray and position padded clamps before mixing up the parts. Glue the wall corners and the wall-to-base contact surfaces with a wood adhesive suitable for the materials. Use only enough pressure to close the joints. Clamp pressure that bends a thin wall can distort the rectangle.
Check the two diagonal measurements across the inside opening. Equal diagonals are a helpful check, but also inspect each corner with a square and make sure the base stays flat. Remove squeeze-out using the adhesive maker’s recommended method, then leave the assembly undisturbed for its stated clamp and cure times.
Make the final checks
After curing, set the tray on a flat surface. A rocking corner may come from a twisted base or uneven feet; investigate before sanding the entire bottom. Hand-sand edges with the tray supported so it cannot slide away. Collect sanding dust and keep hands away from the path of any cutting tool.
Use a finish compatible with the intended indoor service, following its label and allowing it to cure before objects rest on it. Lift the tray from underneath. The short butt joints and glued base have not been load-tested, so do not add handles and assume it can carry heavy objects.
What to take with you
- Measured wall thickness controls the end-wall length.
- Flat contact surfaces matter more than excessive clamp pressure.
- A decorative tray needs separate testing before becoming a carrying tray.
A few good questions
Can I use thicker plywood?
Yes. A thicker base changes the overall height but not these wall lengths. It also adds weight; reconsider the proportions before cutting.
Why are the corners gapped?
Check whether the ends are square and the base is flat. Do not expect glue to correct a visibly poor fit.